GCSE Tutoring Programme
"Our chosen students improved 1.19 of a grade on average - 0.45 more than those who didn't have the tutoring."
This topic is relevant for:

Column Vector
Here we will learn about column vectors, including how to write a column vector and how to draw a diagram of a column vector.
There are also vector worksheets based on Edexcel, AQA and OCR exam questions, along with further guidance on where to go next if you’re still stuck.
What is a column vector?
A column vector is a way of writing a vector which gives information about the vector. It is split into a horizontal component and a vertical component.
There is a horizontal component, also known as the \textbf{x} component This is the top number in the column vector and tells us how many spaces to the right or left to move.
If the number is positive, the direction is to the right.
If the number is negative, the direction is to the left.
There is a vertical component, also known as the \textbf{y} component. This is the bottom number in the column vector and tells us how many spaces up or down to move.
If the number is positive, the direction is upwards.
If the number is negative, the direction is downwards.
E.g.
Vector \textbf{a} can be written as the column vector \begin{pmatrix} \; 3 \;\\ \; 2 \; \end{pmatrix}
\textbf{a}= \begin{pmatrix} \; 3 \;\\ \; 2 \; \end{pmatrix} \text{is} \begin{pmatrix} 3 \ \text{right}\\ 2 \ \text{up}\\ \end{pmatrix}Notice the horizontal component and the vertical component make a right-angled triangle.
E.g.
Vector \textbf{b} can be written as the column vector \begin{pmatrix} \; 3 \;\\ \; -4 \; \end{pmatrix}
Notice the horizontal component and the vertical component make a right-angled triangle.
What is a column vector?
How to write a column vector
In order to write a vector as a column vector:
- Work out the horizontal component ( \textbf{x} component).
- Work out the vertical component ( \textbf{y} component).
- Write the column vector.
How to write a column vector

Column vector worksheet

Get your free column vector worksheet of 20+ questions and answers. Includes reasoning and applied questions.
DOWNLOAD FREE
Column vector worksheet

Get your free column vector worksheet of 20+ questions and answers. Includes reasoning and applied questions.
DOWNLOAD FREERelated lessons on vectors
Column vector is part of our series of lessons to support revision on vectors. You may find it helpful to start with the main vectors lesson for a summary of what to expect, or use the step by step guides below for further detail on individual topics. Other lessons in this series include:
Column vector examples
Example 1: write a column vector
Write vector \textbf{a} as a column vector.
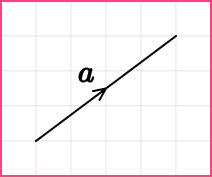
- Work out the horizontal component ( \textbf{x} component).
From the starting point of the vector, draw a horizontal line.
This line is 4 squares to the right.
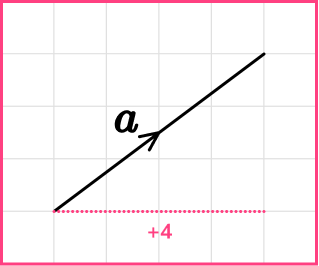
2Work out the vertical component ( \textbf{y} component).
From the end of the horizontal component, draw a vertical line to the end of the vector.
This line is 3 squares up.
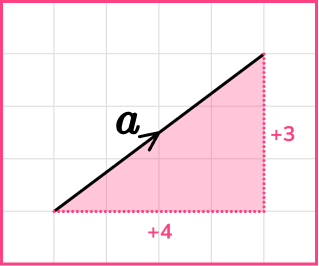
3Write the column vector.
Write the horizontal component and the vertical component in a column vector.
Vector \textbf{a} as a column vector is:
\textbf{a}= \begin{pmatrix} \; 4 \;\\ \; 3 \; \end{pmatrix}Example 2: write a column vector
Write vector \textbf{b} as a column vector.
Work out the horizontal component ( \textbf{x} component).
From the starting point of the vector, draw a horizontal line.
This line is 4 squares to the right.
Work out the vertical component ( \textbf{y} component).
From the end of the horizontal component, draw a vertical line to the end of the vector.
This line is 1 square down.
Write the column vector.
Write the horizontal component and the vertical component in a column vector.
Vector \textbf{b} as a column vector is:
\textbf{b}=
\begin{pmatrix}
\; 4 \;\\
\; -1 \;
\end{pmatrix}
Example 3: write a column vector
Write vector \textbf{v} as a column vector.
Work out the horizontal component ( \textbf{x} component).
From the starting point of the vector, draw a horizontal line. We are trying to make a right-angled triangle.
This line is 2 squares to the left.
Work out the vertical component ( \textbf{y} component).
From the end of the horizontal component, draw a vertical line to the end of the vector.
This line is 1 square down.
Write the column vector.
Write the horizontal component and the vertical component in a column vector.
Vector \textbf{v} as a column vector is:
\textbf{v}=
\begin{pmatrix}
\; -2 \;\\
\; -1 \;
\end{pmatrix}
How to draw a vector using a column vector
In order to draw a diagram of a column vector:
- Draw the horizontal component ( \textbf{x} component).
- Draw the vertical component ( \textbf{y} component).
- Draw the vector.
How to draw a vector using a column vector
Drawing a diagram of a column vector examples
Example 4: draw a diagram of the column vector
Draw a diagram of the column vector \begin{pmatrix} \; 2 \;\\ \; 5 \; \end{pmatrix}
Draw the horizontal component ( \textbf{x} component).
On the grid choose a starting point and draw the horizontal component
The top number is 2 so we draw a line 2 squares to the right .
Draw the vertical component ( \textbf{y} component).
From the end of the horizontal component, draw the vertical component.
The bottom number is 5 so we draw a line 5 squares up.
Draw the vector.
Join up the starting point and the end point and remember to put the direction arrow on the line.
Example 5: draw a diagram of the column vector
Draw a diagram of the column vector \begin{pmatrix} \; -3 \;\\ \; 1 \; \end{pmatrix}
Draw the horizontal component ( \textbf{x} component).
On the grid choose a starting point and draw the horizontal component
The top number is -3 so we draw a line 3 squares to the left .
Draw the vertical component ( \textbf{y} component).
From the end of the horizontal component, draw the vertical component.
The bottom number is 1 so we draw a line 1 square up.
Draw the vector.
Join up the starting point and the end point and remember to put the direction arrow on the line.
Example 6: draw a diagram of the column vector
Draw a diagram of the column vector \begin{pmatrix} \; -6 \;\\ \; -1 \; \end{pmatrix}
Draw the horizontal component ( \textbf{x} component).
On the grid choose a starting point and draw the horizontal component
The top number is -6 so we draw a line 6 squares to the left.
Draw the vertical component ( \textbf{y} component).
From the end of the horizontal component, draw the vertical component.
The bottom number is -1 so we draw a line 1 square down.
Draw the vector.
Join up the starting point and the end point and remember to put the direction arrow on the line.
Common misconceptions
- Make sure the signs are correct
Remember:
If the top number is positive, the direction is to the right.
If the top number is negative, the direction is to the left.
If the bottom number is positive, the direction is upwards.
If the bottom number is negative, the direction is downwards.
- Column vectors notation
Column vectors only have 2 numbers within the brackets; a top number and a bottom number. There is no need for any other punctuation marks such as commas or semicolons and there is no need for a line to separate the numbers.
Practice column vector questions
1. Write this vector as a column vector:


Draw a horizontal line and a vertical line and count the squares.
\begin{pmatrix} \; 4 \;\\ \; 1 \; \end{pmatrix}
2. Write this vector as a column vector:


Draw a horizontal line and a vertical line and count the squares.
\begin{pmatrix} \; -2 \;\\ \; 4 \; \end{pmatrix}
3. Write the vector \textbf{x} as a column vector:


Draw a horizontal line and a vertical line and count the squares.
The column vector for \textbf{x} is
\begin{pmatrix} \; 1 \;\\ \; -3 \; \end{pmatrix}
4. Draw the vector
\begin{pmatrix} \; 1 \;\\ \; 4 \; \end{pmatrix}


The top number of the column vector is 1 . This is the horizontal component. Use this to draw a horizontal line to the right. The bottom number of the column vector is 4 . This is the vertical component. Use this to draw a vertical line upwards.
5. Draw the vector
\begin{pmatrix} \; -3 \;\\ \; -2 \; \end{pmatrix}


The top number of the column vector is -3 . This is the horizontal component. Use this to draw a horizontal line to the left. The bottom number of the column vector is -2 . This is the vertical component. Use this to draw a vertical line downwards.
6. Draw the vector
\begin{pmatrix} \; -5 \;\\ \; 2 \; \end{pmatrix}


The top number of the column vector is -5 . This is the horizontal component. Use this to draw a horizontal line to the left. The bottom number of the column vector is 2 . This is the vertical component. Use this to draw a vertical line upwards.
Column vector GCSE questions
1. Which is the correct column vector for this vector?
\begin{aligned} &\quad \text{A} \quad \quad\quad \quad \;\; \text{B} \quad \quad \quad \quad \text{C} \quad \quad \quad \quad \text{D} \\\\ &\begin{pmatrix} \; 4 \;\\ \; 0 \; \end{pmatrix} \quad \quad \begin{pmatrix} \; -4 \;\\ \; 0 \; \end{pmatrix} \quad \quad \begin{pmatrix} \; 0 \;\\ \; 4 \; \end{pmatrix} \quad \quad \begin{pmatrix} \; 0 \;\\ \; -4 \; \end{pmatrix} \end{aligned}
(1 mark)
(1)
2. The column vector \begin{pmatrix} \; 4 \;\\ \; a \; \end{pmatrix} represents:
What is the value of a ?
(1 mark)
(1)
3. Write the column vector for this vector
(2 marks)
(For the correct horizontal component)
(1)
(For the correct vertical component)
(1)
Learning checklist
You have now learned how to:
- How to write a vector as a column vector
- How to draw a diagram of a column vector
The next lessons are
Did you know?
Not covered in GCSE: we can transpose a column vector to write it as a row vector (and vice versa). These look like co-ordinates, but do not have commas.
Vectors can also be extended into A Level Maths and Further Maths by learning how to multiply two vectors together using the dot product.
Column vectors are a simple example of matrices. In GCSE maths we have a single column. Matrices are studied in A Level Further Maths. The number of columns and rows will be more than 1 . Matrix multiplication can be studied along with finding the inverse of a matrix. We can also find the determinant of a matrix and go further and look into eigenvalues and eigenvectors.
Still stuck?
Prepare your KS4 students for maths GCSEs success with Third Space Learning. Weekly online one to one GCSE maths revision lessons delivered by expert maths tutors.

Find out more about our GCSE maths tuition programme.