GCSE Tutoring Programme
"Our chosen students improved 1.19 of a grade on average - 0.45 more than those who didn't have the tutoring."
In order to access this I need to be confident with:
2D shapes Coordinates maths Rotational symmetryThis topic is relevant for:

Rotations
Here we will learn about rotations about a point, including how to describe rotations.
There are also rotations worksheets based on Edexcel, AQA and OCR exam questions, along with further guidance on where to go next if you’re still stuck.
What are rotations?
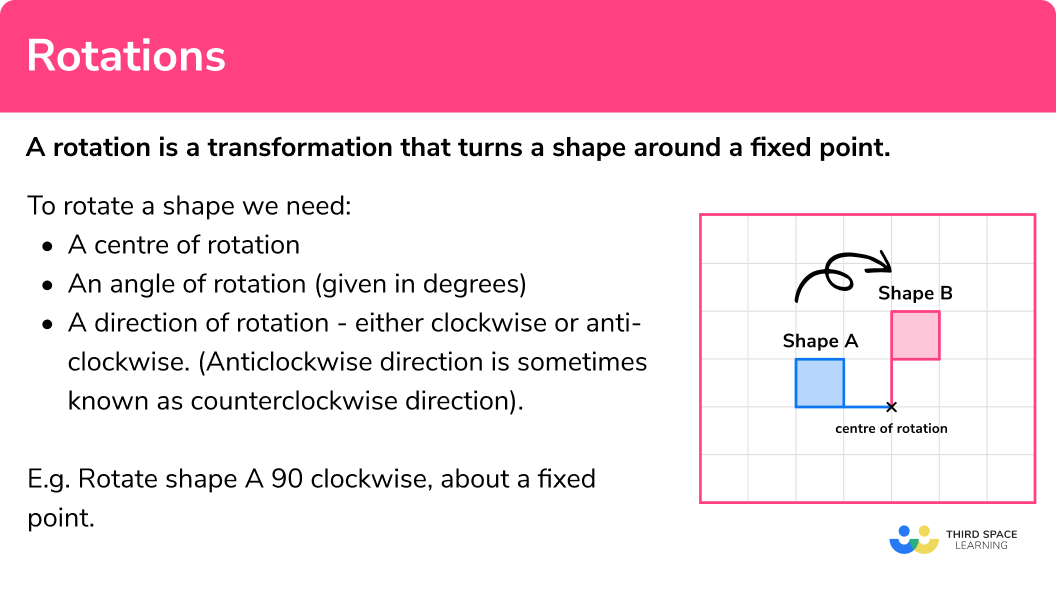
Rotations are transformations that turn a shape around a fixed point.
To rotate a shape we need:
- a centre of rotation
- an angle of rotation (given in degrees)
- a direction of rotation – either clockwise or anti-clockwise. (Anti-clockwise direction is sometimes known as counterclockwise direction).
E.g.
Rotate shape A 90^o clockwise, about a fixed point.
Shape A has been rotated a quarter turn clockwise to give shape B.
E.g.
Rotate shape A 180^o about a fixed point.
The shape A has been rotated a half turn to give shape B.
Whether the direction is clockwise or anti-clockwise (counterclockwise) is irrelevant.
Using tracing paper can be very useful when using rotations.
We call the original shape the object and the rotated shape the image.
For rotations the object shape and the image shape are congruent because they are the same shape and the same size.
As the lengths of the shape have been kept the same so the shapes are said to have isometry.
See also: Rotational symmetry
What are rotations?
How to rotate a shape about a fixed point
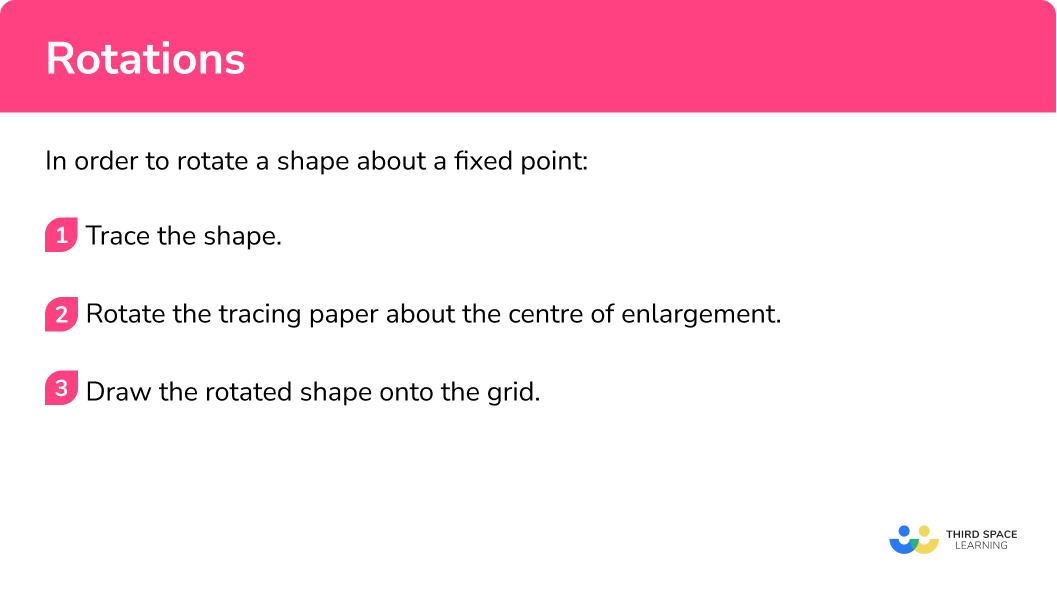
In order to rotate a shape about a fixed point:
- Trace the shape.
- Rotate the tracing paper about the centre of enlargement.
- Draw the rotated shape onto the grid.
Explain how to rotate a shape about a fixed point

Rotations worksheet

Get your free rotations worksheet of 20+ questions and answers. Includes reasoning and applied questions.
DOWNLOAD FREE
Rotations worksheet

Get your free rotations worksheet of 20+ questions and answers. Includes reasoning and applied questions.
DOWNLOAD FREERotations examples
Example 1: rotate a shape about a fixed point
Rotate the shaded shape 90^o clockwise about the fixed point:
- Trace the shape.
Use a pencil and trace the shape onto a piece of tracing paper.
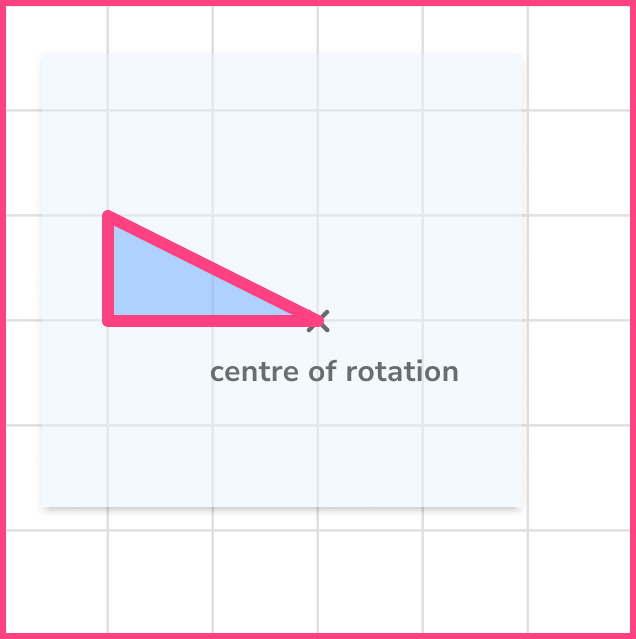
2Rotate the tracing paper about the centre of enlargement.
Use the pencil and put the tip onto the fixed point. Pivot the tracing paper a quarter turn clockwise.
3Draw the rotated shape onto the grid.
Carefully lift the tracing paper and draw the rotated shape in the correct position.
Note: one of the vertices of the triangle has not moved. This is also known as an invariant point of the shape.
Example 2: rotate a shape about a fixed point
Rotate the shaded shape 180^o about the fixed point:
Trace the shape.
Use a pencil and trace the shape onto a piece of tracing paper.
Rotate the tracing paper about the centre of enlargement.
Use the pencil and put the tip onto the fixed point. Pivot the tracing paper.
Draw the rotated shape onto the grid.
Carefully lift the tracing paper and draw the rotated shape in the correct position.
Note: one of the vertices of the triangle has not moved. This is also known as an invariant point of the shape.
Example 3: rotate a shape about a centre of rotation
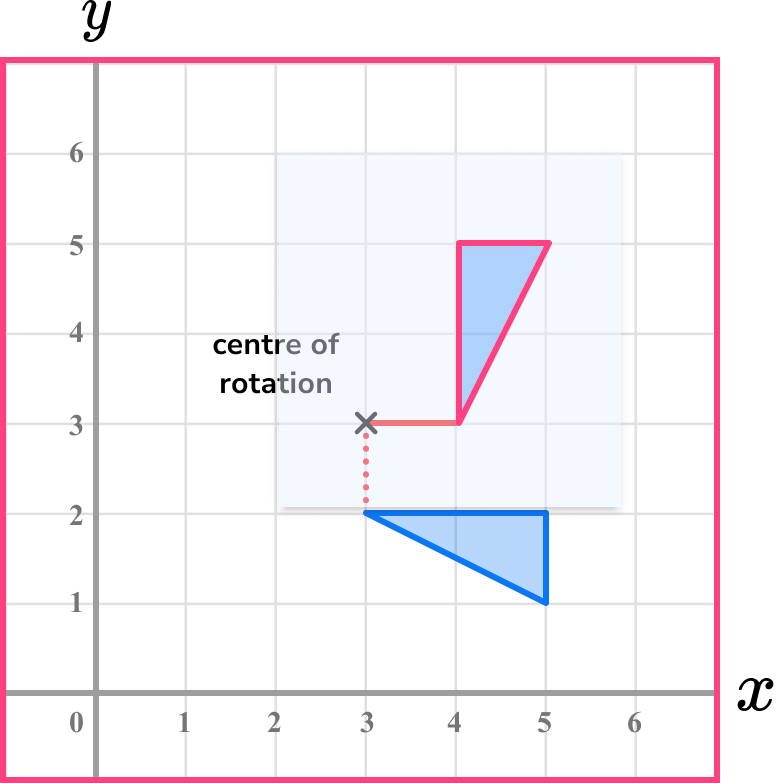
Rotate the shaded shape 90^o anti-clockwise about (3,3)
Mark the centre of rotation.
On the diagram mark the centre of rotation.
Trace the shape.
It can be useful to add a line on the diagram extending from the shape to the centre of rotation. Use a pencil and trace the shape onto a piece of tracing paper.
Rotate the tracing paper.
Use the pencil and put the tip onto the centre of rotation. Pivot the tracing paper. It may be useful to add a line connecting the shape and the centre of rotation.
Draw the rotated shape onto the grid.
Carefully lift the tracing paper and draw the rotated shape in the correct position.
Those dotted lines are extra, but they help to show more clearly that the shape has been rotated correctly.
Example 4: rotate a shape about a centre of rotation
Rotate the shaded shape 180^o about O:
Mark the centre of rotation.
On the diagram mark the centre of rotation. O stands for the Origin of the coordinate grid and has the coordinates (0,0)
Trace the shape.
It can be useful to add a line on the diagram extending from the shape to the centre of rotation. Use a pencil and trace the shape onto a piece of tracing paper.
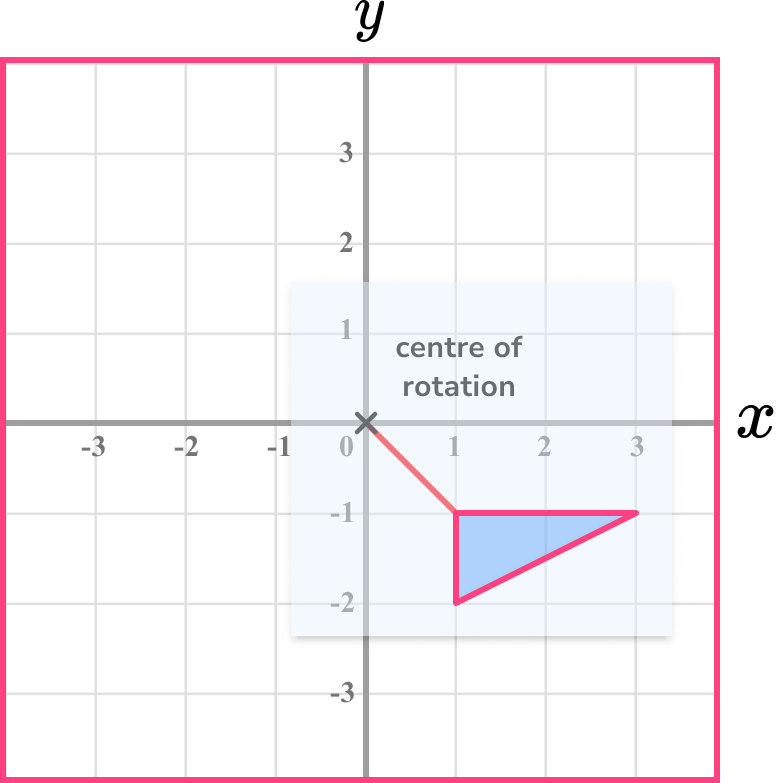
Rotate the tracing paper.
Use the pencil and put the tip onto the centre of rotation. Pivot the tracing paper. It may be useful to add a line connecting the shape and the centre of rotation.
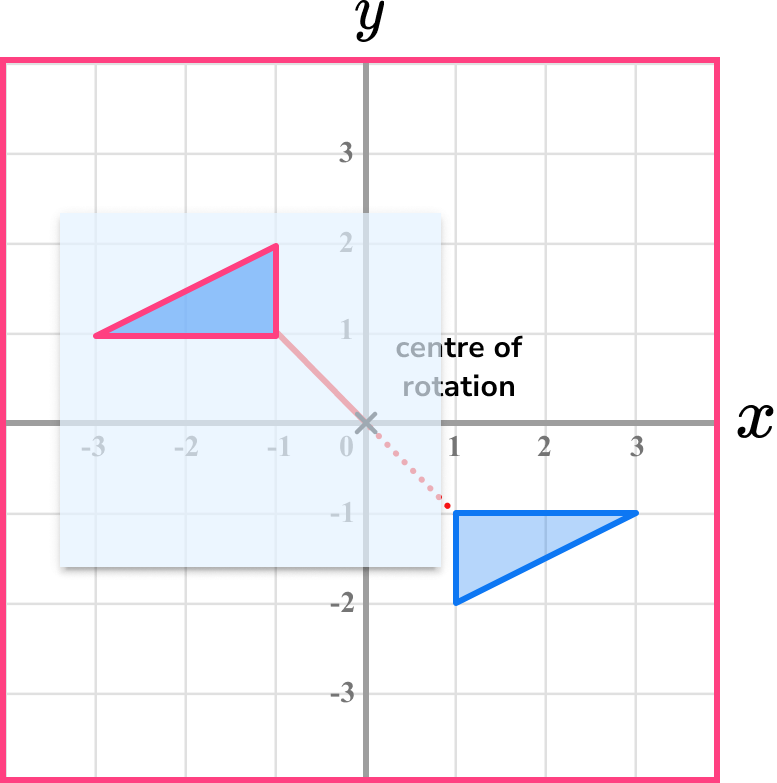
Draw the rotated shape onto the grid.
Carefully lift the tracing paper and draw the rotated shape in the correct position.
Those dotted lines are extra, but they help to show more clearly that the shape has been rotated correctly.
How to describe a rotation
In order to describe a rotation:
- Trace the shape.
- Rotate the tracing paper.
- Write down the description.
Describing rotations examples
Example 5: describe a rotation
Describe the rotation of shape A to shape B
Trace the shape.
Use a pencil and trace the object shape onto a piece of tracing paper.
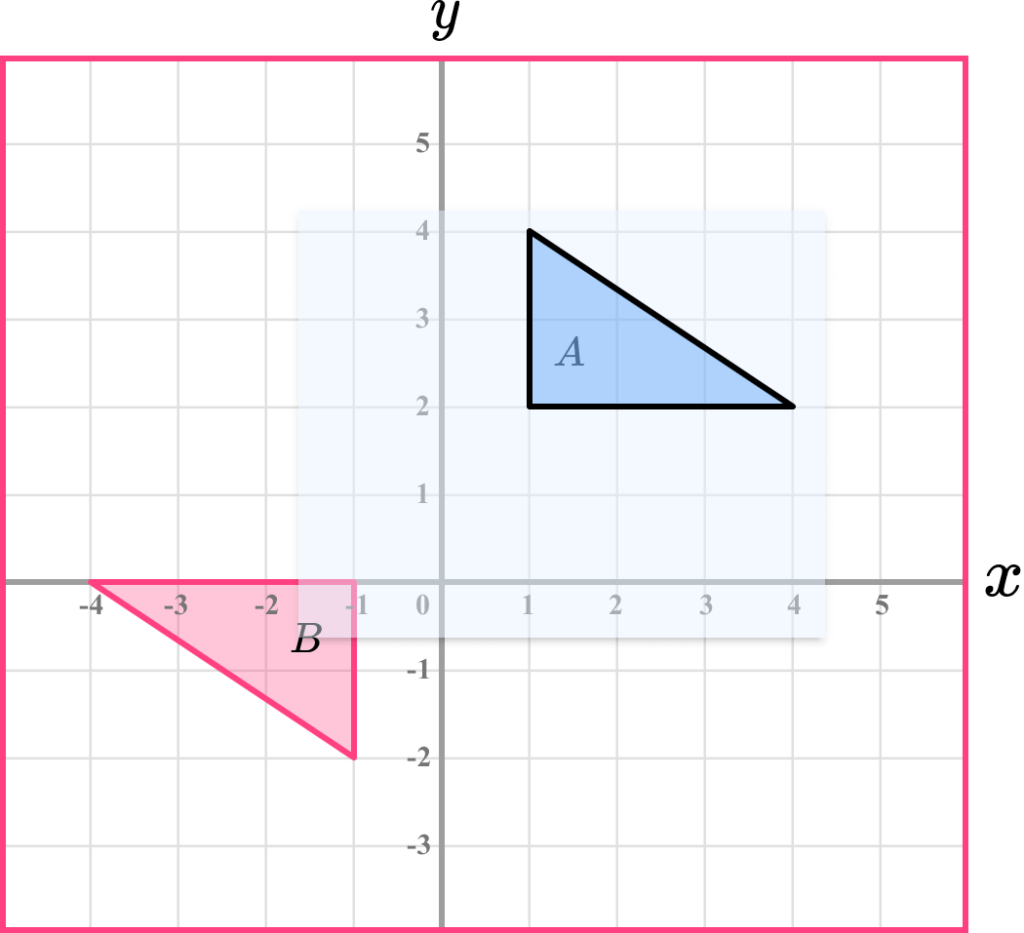
Rotate the tracing paper.
Have a think about where the centre of rotation might be. Use the pencil and put the tip onto that point. Pivot the tracing paper to check. It may take a few tries until you find the correct centre of rotation.
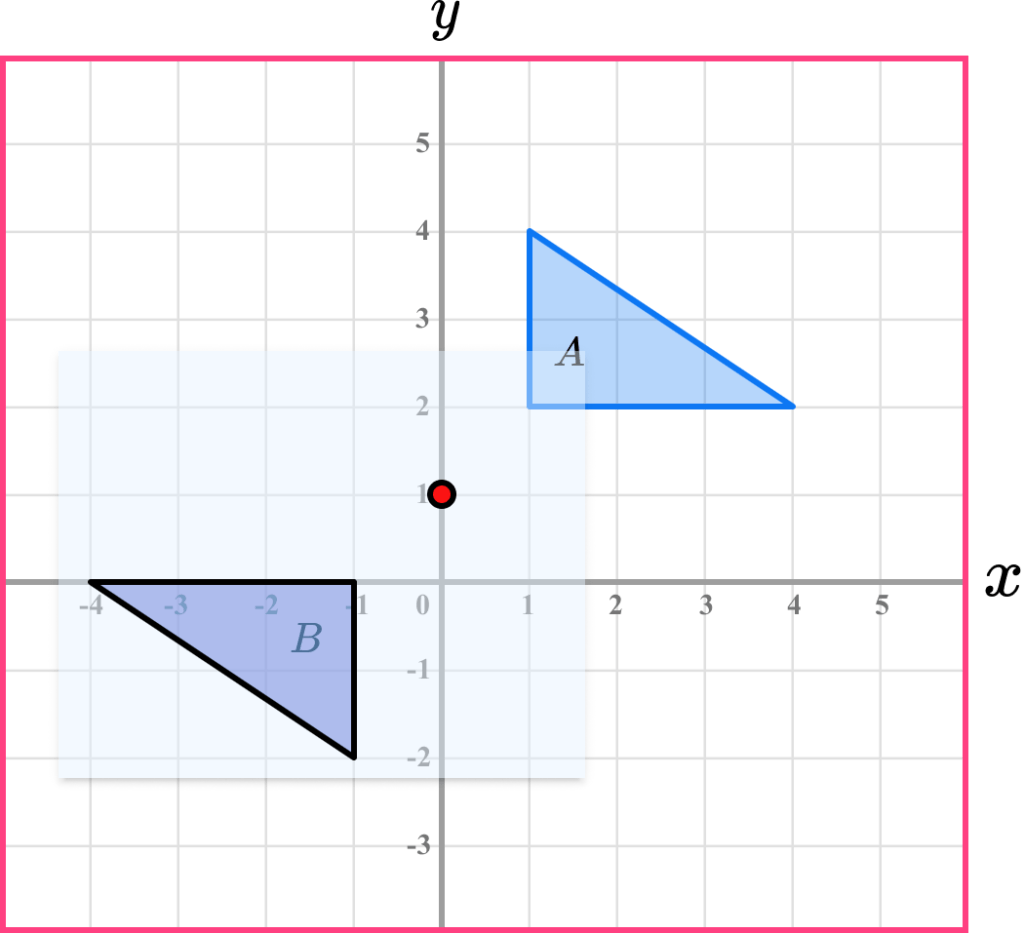
Write down the description.
Make sure you state that it is a rotation. Then give the angle of rotation and if necessary the direction of rotation. Also give the coordinates of the centre of rotation.
Rotation 180^o about the point (0,1)
Since the rotation is a half-turn, no direction is needed.
Since the rotation was 180^o, if we connect the vertices in corresponding pairs, these lines all cross at the centre of rotation.
Example 6: describe a rotation
Describe the rotation of shape A to shape B
Trace the shape.
Use a pencil and trace the object shape onto a piece of tracing paper.
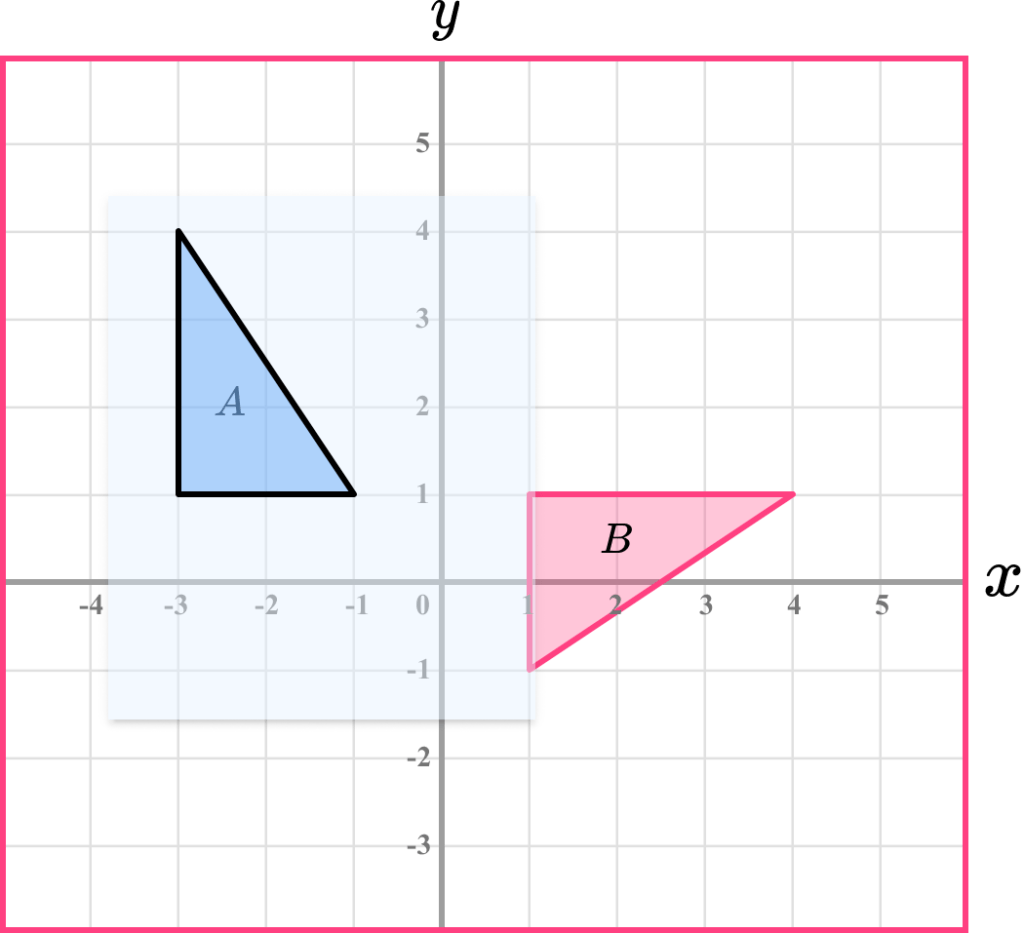
Rotate the tracing paper.
Have a think about where the centre of rotation might be. Use the pencil and put the tip onto that point. Pivot the tracing paper to check. It may take a few tries until you find the correct centre of rotation.
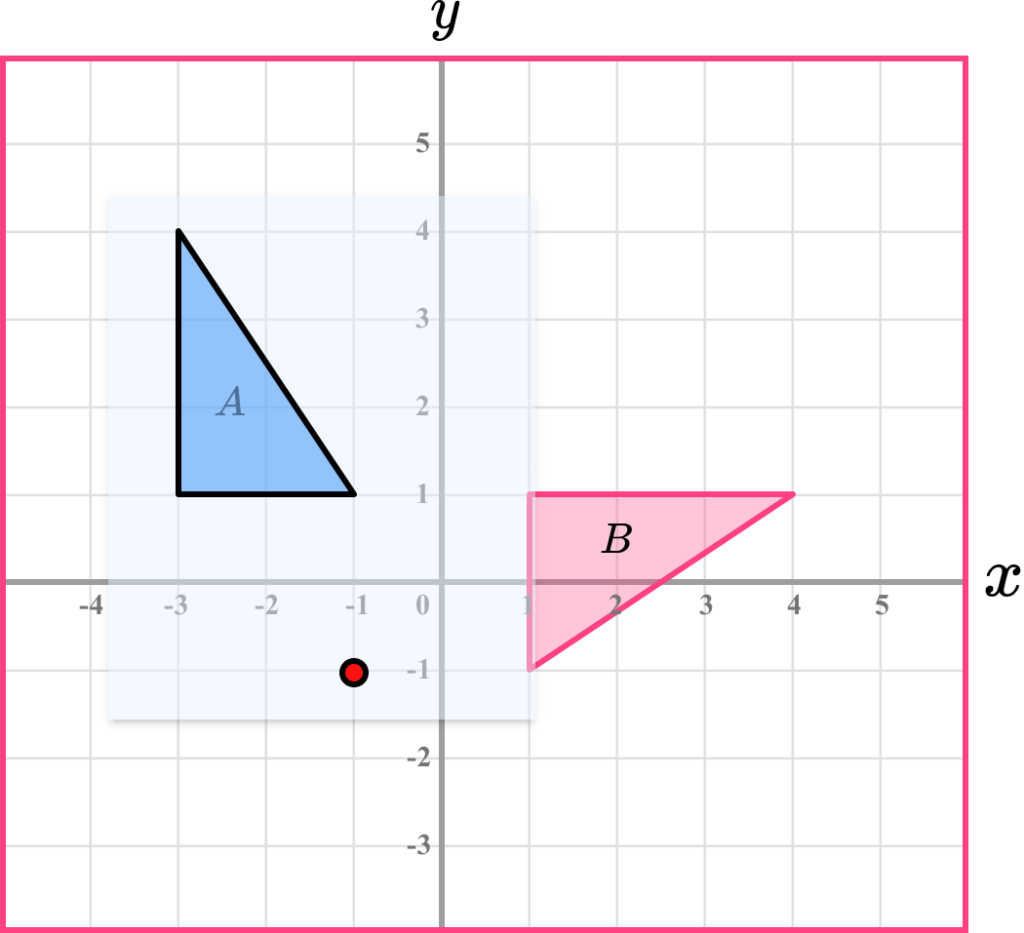
Write down the description.
Make sure you state that it is a rotation. Then give the angle of rotation and if necessary the direction of rotation. Also give the coordinates of the centre of rotation.
Rotation 90^o clockwise about the point (-1,-1)
Common misconceptions
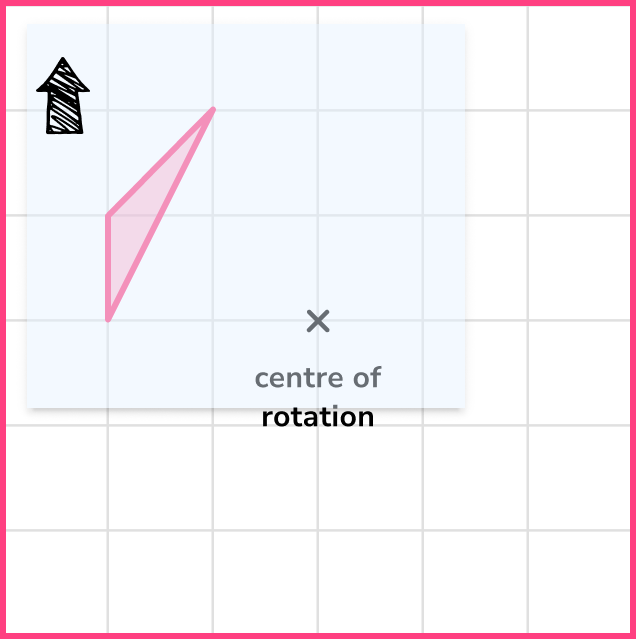
- Rotate with the correct angle
Adding a small arrow onto your tracing paper can help to rotate the shape by the correct angle.
- Clockwise and anticlockwise
You may need to look at a clock to remind yourself of the difference between clockwise and anticlockwise.
- The origin
The origin of a coordinate grid has the coordinates (0,0) . It is commonly denoted as O. It is used often as the centre of enlargement.
- Position of the centre of rotation
The centre of rotation can be within the object shape.
E.g.
- Alternative angles and directions
A rotation of 270^o clockwise is a correct alternative to 90^o anti-clockwise.
A rotation of 270^o anti-clockwise is a correct alternative to 90^o clockwise.
Practice rotation questions
1. Rotate the shaded shape 180^o about the centre of rotation:


The object shape has to be rotated a half-turn. It needs to have been rotated about the centre of rotation. It can not have been reflected.
2. Rotate the shaded shape 90^o anti-clockwise about the centre of rotation:


The object shape has to be rotated 90^o anticlockwise. The centre of rotation should be used. The additional extra dotted lines may help to make this rotation clearer.
3. Rotate the shaded shape 90^o clockwise about (0,0):


The object shape has to be rotated 90^o clockwise. The centre of rotation should be the Origin. The additional extra dotted lines help to make this rotation clearer.
4. Rotate the shaded shape 180^o about (-1,0):


The centre of rotation should be the (-1,0). The additional extra dotted lines help to make this rotation clearer.
5. Describe the rotation of shape A to shape B
Rotation
90^o clockwise
About (1,1)

Rotation
90^o clockwise
About the origin

Rotation
90^o anticlockwise
About the origin

Rotation
90^o anticlockwise
About (1,1)

Make sure you know which is the original, object shape and which is the image shape. The additional extra dotted lines help to make this rotation clearer. The centre of rotation is (0,0), the origin.
Be careful with the direction of the rotation, or you may give the inverse. The inverse would give the rotation of the image to the object.
6. Describe the rotation of shape A to shape B
Rotation
180^o
About (1,1)

Rotation
90^o anticlockwise
About the origin

Reflection
180^o
About (0,0)

Rotation
180^o
About (-1,-1)

Make sure you know which is the original, object shape and which is the image shape. Since this is a half-turn the direction of the 180^o is not needed.
The additional extra dotted lines help to make this rotation clearer. The centre of rotation is (-1,-1).
Rotations GCSE questions
1. On the grid, rotate the kite 90^o clockwise about the point O.
(2 marks)
For any rotation of 90^o
(1)
For a rotation of 90^o and in the correct direction and about the correct centre of rotation
(1)
2. Rotate the triangle 90^o anti-clockwise about (0,0)
(2 marks)
For any rotation of 90^o
(1)
For a rotation of 90^o but in the correct direction and about the correct centre of rotation
(1)
3. Describe fully the single transformation which maps triangle A onto triangle B.
(3 marks)
Rotation
For stating the transformation is a rotation
(1)
180^o
For giving the angle, the direction is not needed
(1)
About the point (3,4) but in the correct direction and about the correct centre of rotation
(1)
Learning checklist
You have now learned how to:
- Rotate 2D shapes on a grid
- Rotate 2D shapes on a coordinate grid given a centre of rotation
- Describe fully a rotation of a 2D shape
The next lessons are
Beyond GCSE
Beyond the scope of GCSE mathematics is three-dimensional rotation, also known as 3D rotation which includes quaternion rotation. Euler angles are used in 3D rotation. We can also use matrices to help us with more complex rotations; one of these is known as a rotation matrix.
Still stuck?
Prepare your KS4 students for maths GCSEs success with Third Space Learning. Weekly online one to one GCSE maths revision lessons delivered by expert maths tutors.

Find out more about our GCSE maths tuition programme.